Showing posts with label man cards. Show all posts

21 September 2008

Birthday Sparkles

This is such a fun combination -- birthday, cake, glitter, ribbon AND stamping!!! I am not sure what more a girl could ask for ;o)

The actual birthday cake is stamped twice -- once for the background that has the candles and then again in real red, cut out and added to the top of the identical background cake with stampin' dimensionals. Glitter was also applied to the popped cake as well -- gotta have that bling.

I'm thinking this could be either a guy card or a gal card because of the colors used -- what do you think?

~TFL & Enjoy~

01 August 2008

Sneek Peek ~ Birthday Wishes

How cool!! Once again SU! is doing a great job of getting us all pumped up for the new catalog! Yeah!! This is a fun, different size, card we can all do!!

Stamps
Wow Flowers stamp set

Paper
Pacific Point card stock (6" x 6")
Whisper White card stock
Kiwi Kiss textured card stock
Riding Hood Red textured card stock
Tangerine Tango textured card stock

Ink

Kiwi Kiss Classic Stampin' Pad
Riding Hood Red Classic Stampin' Pad
Tangerine Tango Classic Stampin' Pad
Whisper White Craft Stampin' Pad
Accessories
White Stampin' Emboss powder
Vintage brads
Stampin' Dimensionals
Crafters' Tool Kit
Heat tool
Paper Cutter
1/16" Circle punch
1" Circle punch
1-3/4" Circle punch
Silver elastic cord

Instructions
Pierce overlapping half-circles in Pacific Point card using paper-piercing tool from Crafters' Tool Kit.

Stamp "Birthday wishes" in Whisper White ink on card. Cover sentiment with White Stampin' Emboss powder, and heat emboss.

Punch three circles from Kiwi Kiss, Riding Hood Red, and Tangerine Tango textured card stock using 1-3/4" Circle punch. Create four score lines across each circle using scoring blade on paper cutter. Adhere circles to card and trim as necessary.

Stamp wheel image in Kiwi Kiss, Riding Hood Red, and Tangerine Tango ink on Whisper White card stock. Punch images out using 1" Circle punch. Punch hole in center of each circle using 1/16" Circle punch, and attach Silver brads.

Adhere circles to card using Stampin' Dimensionals.

Adhere silver elastic cord to card.


~Enjoy & TFL~

05 May 2008

Get Well Greetings

Here is a card that I recently sent out to a co-worker who had surgery and we are all excited for him to return to work!

This is one of my favorite 'outdoor' stamp sets ;o)

Enjoy!

12 March 2008

I'm Wishin!!

I'm hoping and wishing to get back to my stampin' space soon! LOL
Here is another fun card direct from our friends at SU! to share with you!!

Stamps:
A LITTLE BIRTHDAY CHEER STAMP SET
CLASSIC BACKGROUNDS STAMP SET

Paper:
CARD STOCK OLD OLIVE 8 1/2X11
CARD STOCK WHISPER WHITE 8 1/2X11
CARD STOCK KRAFT 8 1/2X11
CARD STOCK BASHFUL BLUE 8 1/2X11

Ink:
CRAFT STAMPIN PAD BRILLIANT BLUE
CLASSIC STAMPIN PAD OLD OLIVE
CLASSIC STAMPIN PAD BASHFUL BLUE

Accessories:
SPONGE DAUBERS
GLUE DOTS MINI
CRAFTERS' TOOL KIT
PUNCH 1/2 INCH CIRCLE
RIBBON GROSGRAIN REAL RED 1/4 INCH
ON BOARD HEARTS AND STARS BULK

Instructions:
1. Color chipboard star using Brilliant Blue Craft ink and sponge daubers. Set aside to dry.
2. Stamp argyle background in Bashful Blue ink across bottom of Bashful Blue card stock (4-1/4″ x 3-1/2″). Pierce row of holes along top of card stock using paper-piercing tool from Crafters’ Tool Kit. Adhere to Kraft card.
3. Adhere Old Olive card stock (4-1/4″ x 1″) to card. Punch five 1/2″ circles from second piece of Old Olive card stock (4-1/4″ x 1″), and adhere to card.
4. Stamp saying in Old Olive ink on Whisper White card stock (1-5/8″ x 1/2″), and adhere to chipboard star. Tie knot in Real Red narrow grosgrain ribbon, and adhere to star. Adhere star to card.
On Board chipboard adds interest to any project, and you can color and embellish it inso many ways. It’s designed especially for use with rubber stamping and scrapbooking, so it’s light enough to make application easy. The new Book Basics makes it so fun to createpersonalized albums and journals. Just cover or embellish it and bind it with book clips,ribbons, rings, or anything you want.
~TFL & Enjoy~

07 March 2007

Happy Birthday Dearie!!

This was one of the cards that I demo'd late in February. I had two groups of gals that actually got together twice last month to take advantage of the SAB promo so I had to quickly come up with a few new ideas for them ~ and this one was one them ;o) I had my DH birthday in mind when I was thinking about this too. But I must give credit to SCS'er AmyR for this awesome layout ~ Many Thanks Amy!! I changed her 'thank you' card into a 'guys birthday card'. I never seem to have enough 'guy cards' on hand!!

I used the Color Coach to come up with my card stock colors for this card. The base is Old Olive, topped with a Bravo Burgundy base. The truck is framed in More Mustard, Old Olive and Naturals White.

The stamp sets I chose were Classic Pickups, Flannel Plaid BG and Everyday Flexible Phrases.

The Stampin’ Pads I used included Bravo Burgundy, More Mustard, Basic Black, Old Olive. When I colored in the pickup I used the Aqua Painter --- what a fun and handy tool that is!!

Other accessories included: Linen Thread, Copper Cord, Vintage Brads, Stampin’ Dimensionals, 1/16” Circle Punch and the Tag Corner Punch.

~Enjoy & TFL~

24 January 2007

Happy Day

So here 'recipe #3' for my January demos!
Once again, I relied on my Color Coach to come up with these colors!! This picture seems to be a bit bright but the tag is Naturals Ivory and it's layered on Bashful Blue.

I thought this color combo and layout would be a great 'guys card' --- be it birthday or anything out of the taggers dozen for him! I had one gal suggest at a demo last night that it could possibly even be used for a guys sympahthy card by just changing the tag sentiment --- soo true!!!

I am sooo happy that the stitched grosgrain ribbons are still available for us to order!! Yeah! I just love em' to pieces and was soo not looking forward to putting them away when it came to demo'ing them!

Also, I am finding that I am using the ticket corner punch more and more all the time --- I see sooo many cute ideas done with this that I feel I just have to try too!! This card layout was, once again, inspired by JanTink ~ she just has such an awesome style doesnt she? Here is her awesome card idea!

Here is the list of ingredients:

Stamp Sets: Taggers Dozen, Dotted Background
Card Stock: Not Quite Navy, Always Artichoke, Close to Cocoa, Bashful Blue, Naturals Ivory
Stampin’ Pads: Close to Cocoa, Not Quite Navy
Accessories: True Thyme Stitched Grosgrain Ribbon, Copper Cord, Ticket Corner Punch, Vintage Brads, 1/16” Hole Punch, Small and Regular Tag Punches, Stampin’ Dimensionals

11 November 2006

Simple Plaid Noble Deer

Wow! Was this a quick one or what?! ---but how fun and masculine this will be to give to the guys deserving of cards!

I am just loving the flannel plaid background stamp---I've been using it on just about everything! Humm...wonder how that would work on the walls around the house?! lol

Anywhoo....that is just grosgrain ribbon wrapped around the two corners there and just taped to the back...how simple is that? Just a bit of embellishments but not enough to over do it on a guy card! *wink wink*

Special thanks to SCS'er 'jackgofoxy1' for her inspiration---yeah!!

Here are the ingredients to this card:
Stamps: Noble Deer, Flannel Plaid
Paper: Mellow Moss, Always Artichoke, Chocolate Chip, Confetti Cream
Ink: Mellow Moss, Always Artichoke, Confetti Cream
Accessories: Sponge, Grosgrain Ribbon

~Enjoy & TFL~

07 November 2006

Riveting Revisited!


So I tried to go back and add a 2nd picture to my other post a few days ago---a better picture that is! lol Once again my computer illiteratices are shining through! I figured out where you can add a second picture--but it woud not show up even though it said it uploaded it and all. So anywhoo---for anyone that reads my blog--here are two more pictures that I think turned out quite a bit better the 2nd time around!

~Enjoy & TFL~

03 November 2006

Riveting!

Hello! I have been wanting to post the past few days but have had a little snag in the plan! I was out of town...but had my laptop...I had access to wireless internet access but I was unable to attach a picture to any posts here. Now don't ask my why this was as I am computer illiterate when it comes to stuff like this!! lol So, even though I am a few days behind the plan, here goes!

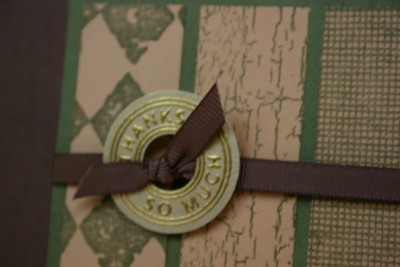
My Dad recently had a birthday AND knee replacement (thus the reason I was out of town for a few days). Pictured in the foreground is the birthday card I made for him. I wanted it to look 'masculine' and I wanted to use the "Riveting" SU! Hostess stamp set. I had seen a card posted on SCS by (kellykk) and I just loved the look of using different background stamp sets.

Here is a list of supplies I used:
Stamps: Linen BG, Print Pattern BG, Weathered BG, Canvas BG, Riveting (hostess)
Card Stock: Chocolate Chip, Always Artichoke, Creamy Caramel, Brushed Gold
Stampin Pads: Chocolate Chip, Always Artichoke

Accessories: Gold Embossing Powder, 1 3/8" & 1 1/4" Circle Punches, Chocolate Grosgrain Ribbon

The base of the card is Chocolate Chip cs and I stamped the entire front of the card using the Linen BG in chocolate chip ink.

Then I stamped the Print Pattern, Weathered and Canvas background stamps on Creamy Caramel cs using Always Artichoke ink. I cut these into 3 pieces of the same size and mounted them to a piece of Always Artichoke cs.

I wrapped a piece of Chocolate Grosgrain Ribbon around that piece and tied it with a knot (I can't do pretty bows so all are done in knots at my house!)

THEN I stamped the 'enjoy your day' stamp from the hostess Riveting stamp set in the top boss pad and stamped it on the brushed gold paper. I immediately sprinkled the Gold Embossing powder over it and heat set it using the heat gun. The result is an awesome gold on gold tone! Once it cooled, I used the 2 circle punches to punch it out! Then I just simply placed that behind the two tails of my knot---whoola! It's done!

Also, pictured in the same picture in the background inside the plastic card holder are thank you cards using the same design---just changing the riveting greeting to 'thanks so much'. I thought Dad could use the thank you cards to send out after his knee replacement for those that remembered him with their thoughts and prayers. So sorry the picture is soo dark. I wish I could get my pics to turn out so bright and pretty on line like others are able to achieve! I'll keep pluggin' away and tryin'!

~Enjoy & TFL~

26 October 2006

Ode to the outdoors(men)


This is one of my favorite cards to stamp and give for masculine birthdays! Even if they are not a hunter, they can relate to the 'outdoors' theme!

Every other image of the 'warmest wishes' is 'stamped off' for the lighter effect. I used a sponge paintbrush with the SU! Gold Encore re-inker to go around the edge of the warmest wishes part. I used the sponge dauber and Close to Cocoa to go around the deer image.

Note to self----The next card I stamp like this I am going to try the linen background in place of the canvas background and see how different it looks---Then I thought I would give the flannel background stamp a try as well---I think that would look good too! I am using the flannel background on lots of cards lately--the thing I think I love about it is that when stamped it is not to look perfect---holes here and there---you know the 'worn' feeling!!

Here is my recipe:
Stamps: Noble Deer, Canvas Background, All-Year Cheer I
Card Stock:Confetti Cream, Basic Black, Close to Cocoa
Ink: Basic Black, Close to Cocoa, Copper Encore, Gold Encore
Accessories: Grosgrain Ribbon, Sponge Dauber, Sponge paintbrush, The Tearing Edge

~Enjoy & TFL~