28 October 2006

Boo 2 U!

I just finished these up earlier today and delivered them! There were a few more but I figured this would be enough for picture purposes! lol

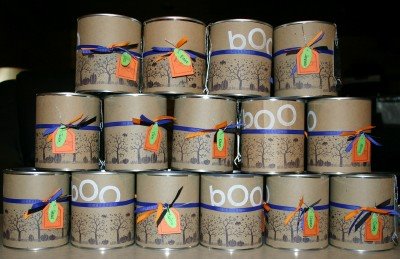
I started out purchasing the quart sized paint cans & openers from Sherwin Williams. The clerk kinda looked at me strange when I asked to buy sooo many! lol

TIP: Something I learned while picking up the cans that I would love to share with you---the cans are cheaper to buy at Sherwin Williams than they are at Menards---this really surprised me too!

I used the Kraft wrapping paper that comes on a roll from any office supply store and cut enough for each can. Then I wheeled on the Jumbo Spooky Skyline from SU! with the basic black jumbo ink cartridge. Then I stamped the 'boo' using the 'Big Deal Alphabet' and the SU! white craft stampin' pad. I used a hot glue gun to adhere each strip of paper to the cans. I used blue grosgrain ribbon to wrap around each can and tied it tight. Then I attached a small piece of black grosgrain ribbon and a small piece of orange grosgrain ribbon to each side of the blue grosgrain tie made. The only orange tags were punched out using the SU! tag punch, and the design is stamped in basic black using the 'Tags so Much' hostess SU! stamp set. The little green galore name tags were punched out using the Small Oval punch from SU!. Both of the tags were punched with the 1/16' circle punch and tied around the grosgrain using the silver cord and this was just tied in with the grosgrain ribbons.

Now to the top of the can---- Because I was making sooo many I wanted to keep it relatively simple. I cut out Brilliant Blue circles with a circle maker and stamped the two images in basic black from the SU! Booglie Eyes stamp set. Then I just used the SU! liquid glue and SU! Dazzling Diamonds glitter on each of the cute little spiders. I attached it to the top of the can and called it complete.

I filled each can full of yummy candy treats that I purchased in the Halloween candy isle at the store! Mmm!

So each recipent could open their can I attached the can opener to the side of each can. I ran a longer piece of silver cord through the hole on each can opener and stuck the end of the cord under the lid before I closed them---this held the can opener in place and the longer cord will allow the recipent to have enough cord that they can open the can with the can opener....gosh that was alotta' cans in that sentence!! lol

Hopefully the recipents will enjoy opening their can of Halloween goodies! These would be great to stamp and decorate for birthdays or really any kind of celebration in your life!

~Enjoy & TFL~

26 October 2006

Ode to the outdoors(men)


This is one of my favorite cards to stamp and give for masculine birthdays! Even if they are not a hunter, they can relate to the 'outdoors' theme!

Every other image of the 'warmest wishes' is 'stamped off' for the lighter effect. I used a sponge paintbrush with the SU! Gold Encore re-inker to go around the edge of the warmest wishes part. I used the sponge dauber and Close to Cocoa to go around the deer image.

Note to self----The next card I stamp like this I am going to try the linen background in place of the canvas background and see how different it looks---Then I thought I would give the flannel background stamp a try as well---I think that would look good too! I am using the flannel background on lots of cards lately--the thing I think I love about it is that when stamped it is not to look perfect---holes here and there---you know the 'worn' feeling!!

Here is my recipe:
Stamps: Noble Deer, Canvas Background, All-Year Cheer I
Card Stock:Confetti Cream, Basic Black, Close to Cocoa
Ink: Basic Black, Close to Cocoa, Copper Encore, Gold Encore
Accessories: Grosgrain Ribbon, Sponge Dauber, Sponge paintbrush, The Tearing Edge

~Enjoy & TFL~

25 October 2006

~ Fall Is In The Air ~

I've been busy the past few days working on Halloween stampin' projects ---cards, cello bag toppers and paint cans (along with the general tasks in everyday life too -- including prep for an audit that is this Friday morning for the apartments we manage---I am a firm believer that stamping is a stress outlet for me!! I will be sooo glad when Friday afternoon rolls around!) But anywhoo, I thought I would post a card tonight that is one of my all time favorites! I am not sure if it is because it is fall, and that *is* my favorite season but I just love the colors and the 'faux metal' technique. The technique, and card layout for that matter, came right from my favorite source of stampin' inspiration---SCS!

Here is the Faux Metal Technique tutorial.

My copper leaf here is the faux metal in this example. And if I can do it---anyone can do it!! Give it a try ~~ it's bunches of fun!! I demo'd this for a favorite stampin' group of mine last year --- I held a little 'customer appreciation' day for them and I tried to show them techniques that I wouldnt normally cover during a week night demo due to time restrictions (and its a tad bit messy and I have a huge fear I would spill the copper embossing powder ALL over their floors! *eek*)

Here is my recipe----
Stamps: Shapes & Shadows, Linen Background
Card Stock: All from the Color Coach; Bravo Burgundy, Handsome Hunter, Mellow Moss, Basic Black (for the faux metal leaf)
Ink: Handsome Hunter, VersaMark
Accessories: Copper Embossing Powder, Sponge, Gold Wide Organdy Ribbon, Burgundy Grosgrain Ribbon, Copper Cord

~Enjoy & TFL~

20 October 2006

Hostess Gifts


Happy TGIF 2U!!

Ever since SCS posted the tutorial for the Acrylic Post It Note Holders I have had fun making these for different little gifts. ---Have I mentioned yet how much I love the SCS website?! lol

I try to do a bit extra for my hostesses because I appreciate them soo! For this (catalog) year I decided they would each get one of these. (styles will vary but I think I will go with the same theme)...I will incorporate their Name initial...to personalize it a bit. So, for instance, the demo I did the other night (sorry no pic!) I incorporated a stamped "S" as my hostess name was Sharon. I used the SU! Four Seasons printed paper pack--the blue snowflake theme for hers. I present them to the hostess at the beginning of the demo and quickly explain how to make them, offering them more detailed directions later if they wish. Sharon thought she would make a few for upcoming Holiday gifts.

Here is the 'recipe' of ingredients used to complete the pictured acrylic holder:

Stamps: Natural Beauty, Linen Background, Print Pattern Background, French Script Background, Small Script,
Paper: Certainly Celery, Night of Navy, Bashful Blue, Confetti Cream
Ink: Night of Navy, Night of Navy re-inker, Certainly Celery,
Accessories: Aqua Painter, Grosgrain Ribbons

~Enjoy & TFL~

19 October 2006

Colored with Linen

Good Morning!! Have you ever stamped a card at home, all by yourself in your stampin' space just you and your stampin' stuff, and it turns out great the first time? SURE!! We all have! THEN have you tried to go duplicate that same card in front of a group of others and it just does not turn out as well as you had hoped? Well....that happened to me last night! I wanted to demo the "Thouroughly Thankful" stamp set -- stressing to the Ladies that you dont need to color it all in, saving time. Sooo I stamp the large TT image on the SU! Natural Ivory card stock --that turned out fine! Then I went to stamp my Linen BG on top of that using more mustard --- uh! I ended up with a big hole where the linen BG didnt get pressed against the cs --- near the leaf image (just to the left of the flower image where the brad is placed in this picture). Sooo trying to think quickly on my feet I just took my aqua painter and dabbed it in the Old Olive stampin pad lid and just colored that ONE leaf in---whoola! Big hole problem solved (and quickly at that!) Believe it or not---the hostess chose that card over this one!! How funny is that---a mistake that turns out to be OK! So I also stamped another and on purpose just colored in the pumpkins--just one image---that is a cool look too!! I used the new distressing tool around the Naturals Ivory cs to give it a different look---that is one fun tool to use!!!

Here is the 'recipe':
Stamps: Throughly Thankful, Linen Background
Paper: More Mustard, Close to Cocoa, Naturals Ivory
Ink: Old Olive, Chocolate Chip, More Mustard
Accessories: RR Brads, 1/16" punch, Stampin' Dimensionals, Vintage Violet Grosgrain Stitched Ribbon, Cutter Kit (distressing tool -- for around the large image)

~Enjoy & TFL~

18 October 2006

Make MERRY


Hello Everyone!! I apologize for taking sooo long to post!! Life has been busy and I have been trying to get this blogging stuff all figured out! LOL! So bear with me here---I have alot to learn yet!! Any tips and tricks from you would be welcomed and appreciated!!

This is a card that I completed in August for a card front swap that I participated in on SCS (I love that place!)

This card features the "Jolly Trees" Stampin' Around wheel on page 12 of the Stampin' UP! Holiday Mini Catalog. I am a huge fan of the Color Coach and chose my color scheme from that. I stamped the Weathered Background Stamp on the Night of Navy cardstock with VersaMark--just enough to give it a little background effect. I wheeled the trees on with the Stampin' Around Wheel Guide. (The wheel guide is a quick tool used to keep the stamped line straight across my cardstock.) I then tore the bottom of the Garden Green cardstock with the The Tearing Edge--boy is that a quick and fun (and sharp!) Also, because I lovvvveee anything tags I had to use my favorite punch---the Tag Punch! I used the Hostess 'Tags So Much' stamp set that is designed to work with this punch! I put a stampin' dimensional under the tag just to pop it up off the card front a bit too. What ya' think about the new stitched grosgrain ribbons SU! has released? I am lovin' em'! I wanted to include one in this project so I chose Cranberry Crisp. I also added a smigen of the Gold Cord just for a festive holiday touch. The "For You" (from 'Happy Everything') sentiment is stamped in Craft White.

It is a pretty plain looking card but when making as many as I did, I felt I had to keep them pretty simple and duplicateable (is that even a word?lol)

~Enjoy & TFL~